In this article, we want to share some insights about Hyvä Themes from MeetUp, the speakers of which were Vinay and Alex Galdin. We want not only to once again emphasize the main theses and share our experience but also to show how much the Hyvä ecosystem has developed. Last year, we were lucky enough to host an event by the Pro Magento Community, which was coordinated by our team. You can get acquainted with this video on other podcasts on our YouTube channel.
An introduction to Hyvä for developers
Vinay Kopp is the CTO of Hyvä and President of the Mage-OS Association. He has been working with Magento as a developer since 2008 and has trained developers for over 10 years.
Vinay explained what “work with Hyvä” means and briefly introduced the technology.
From the beginning, Vinay showed us what is behind the page made on Hyvä Theme – the file size (JS-file and CSS-file) is extremely small compared to other themes such as Luma. That’s why Hyvä Theme scores so well on Core Web Vitals – 100/100.

On the technical side, when you install Hyvä Theme, the main parts are 2 composer packages:
- magento2-default-theme
- magento2-theme-module
He calls other packages more utility. Including:
- magento 2-email-module
- magento2-graphql-tokens
- magento 2-graphql-view-module
- magento2-hyva-checkout
- magento2-reset-theme etc.
Most of the time, we work with the theme, which is just a regular Magento theme, but the main difference is that the parent theme of this theme is Hyva/reset.
So that’s this package, which is another theme, and all this theme does is override every single layout XML file that exists in the base modules or the length theme; it removes all blocks. It just keeps containers, so if somebody were to install the reset theme and choose it as the current theme, the page would be empty.
All we get is a new structure of containers, and then in the magento2-default-theme, that’s where in the layout XML files. The entire front-end stack has been rewritten (all the HTML has been rebuilt), and it has nothing from Luma.
Tailwind CSS
Next, Vinay focused on two specific parts – how the Tailwind CSS works and how it works with JavaScript.
Hyvä uses the Tailwind CSS framework to create templates that are easy to customize, look beautiful on all devices, and make extremely small CSS stylesheets that reduce the data your site visitors have to download.
Tailwind CSS is a utility class framework. This means you don’t typically write CSS classes yourself, but you compose the design of elements with classes defined within Tailwind.
A lot of things in Luma were built with Java Script. We didn’t even have to make them because nowadays they already exist with good support out-of-the-box. Learn more about JavaScript in Hyvä – watch this part of the video:
Alpine JS
Alpine.js is a lightweight JavaScript framework with the same kind of data binding we love in other JS frameworks. Hyvä Themes only uses Alpine JS as its only JS dependency.
The Hyvä theme 1.1.x uses Alpine.js version 2.
The Hyvä theme 1.2.x uses Alpine.js version 3.

Ways to Keep it Fun with Hyvä Themes by Alex Galdin
Alex decided to focus on the practical technical aspects that he uses in his work. If you work with Hyvä as a developer, it will be beneficial for you.
*Please note the video recording date and the fact that Hyvä Themes are constantly updated. Some technical points may be outdated, and the Hyvä team has already solved the difficulties.
Tailwind CSS in theme inheritance
Node JS package
First of all, it’s all about the Node JS package.
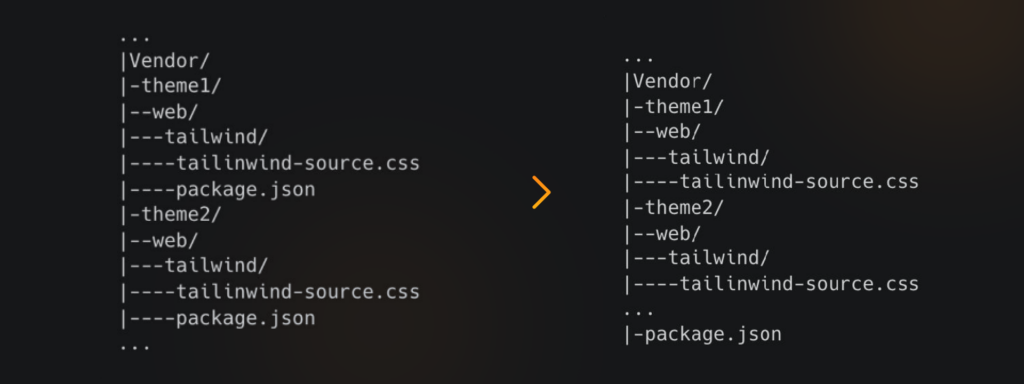
So, when we started using Hyvä, we saw this structure where we had multiple themes in our project. However, over time, the team and Alex decided that we don’t need separate packages for each theme; we need to use one because there are no conflicts in the package versions. When we use a single package, it’s much easier to manage and use each package for the specific theme.
Alex recommends using a single package for all of your themes. If you have multiple vendors, bring the JS package up to the front-end folder and use the single package for all vendors and all themes using Hyvä.
Splitting configurations
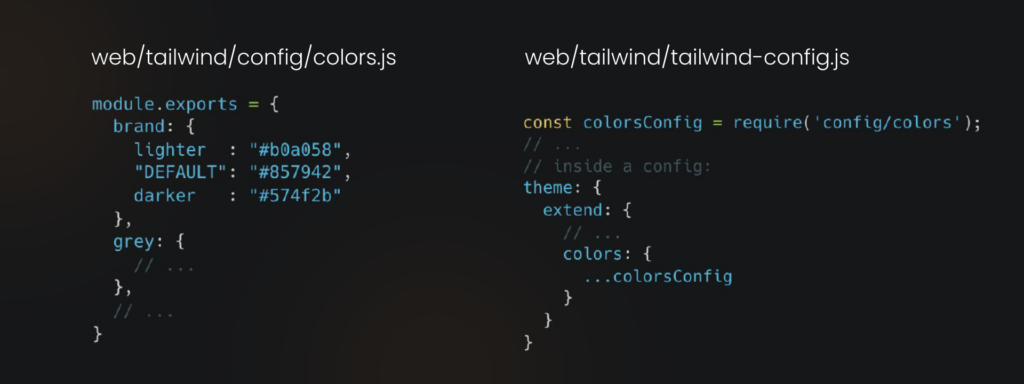
Due to the specific structure of Tailwind CSS and its only a single JS configuration file, which defines all the customizations to a theme, it may be a lot for a single JS file. In such situations, it is better to separate them into different files. As in the example below:
Extending parent configuration
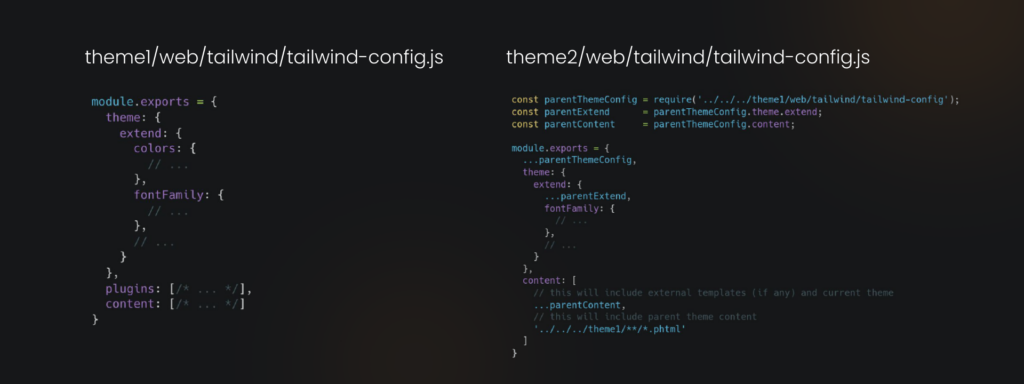
We don’t always have the same things without inheritance when we have multiple themes. It’s usually one theme inheriting another. Let’s imagine we have the same two themes – theme 1 and theme 2. The theme 1 is the parent one, and the theme 2 is the child one, which inherits the theme 1.
For theme 1, we would create some Tailwind configuration with colors, fontFamilies, or other properties and have some plugins. Then, we would have the content entry for the parts of all HTML templates that we have in our theme.
We don’t need a copy-paste configuration; we can import the parent theme to the child. Yes, as shown below:
You can learn about additional Tailwind CSS features in the MeetUp video using the time code below.
Optimizing Alpine JS components for better performance
Alex shared his life hacks for achieving better performance when working with Alpine JS.
Avoid big chunks of data in properties
It is always related to building a more complex user interface. If you’re implementing the collapsible box, there’s nothing about it; it’s a super simple Alpine JS component that works. But when you create something more complex, there might be some lags in the work of your Alpine JS components.
First advice – avoid big chunks of data in the properties.
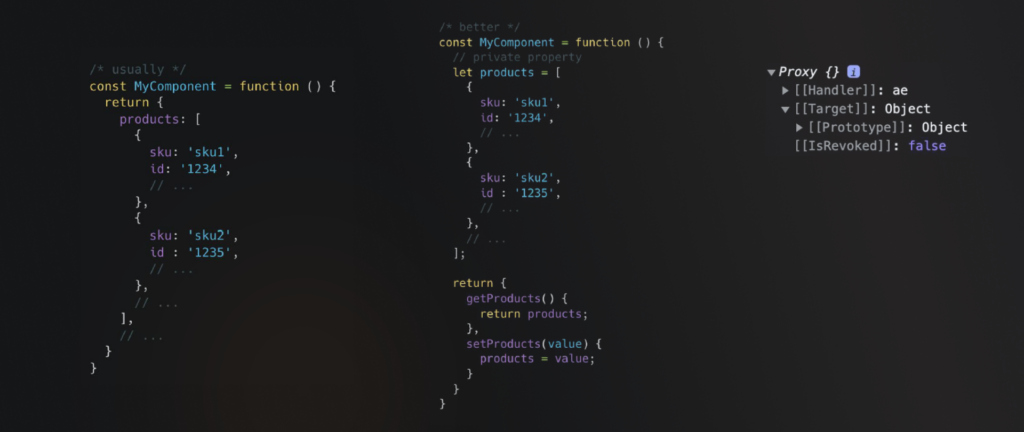
Alpine JS component is just an object with the properties and the methods, but the difference is that for each property of the component, Alpine creates the proxy object and creates it recursively.
Suppose you have property-like products with much data that may be transformed into the proxy object. In that case, consider creating the private property, which will be a static variable and not be converted to the proxy object. Here’s an example of how it can be improved.
Pre-render for lower CLS
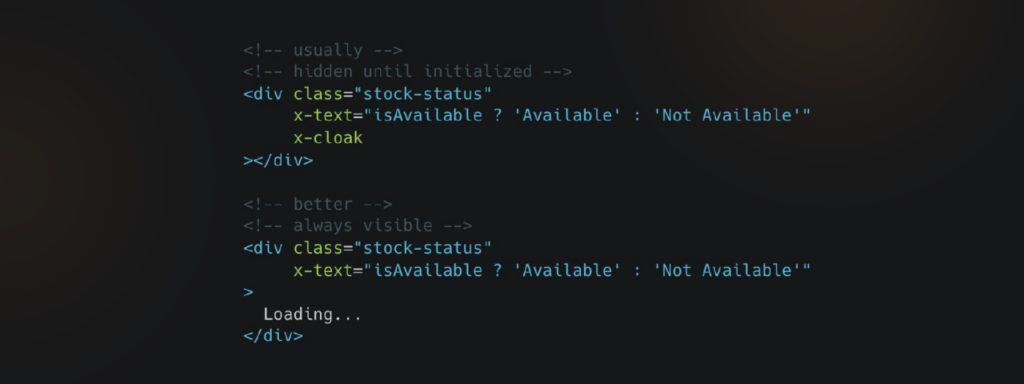
Second advice – always try to pre-render the dynamic data that will be outputted.
Splitting the components
It’s crucial to split components efficiently when working with complex user interfaces. Let me give you an example from one of Alex’s projects. He had a massive table representing grouped products. Each row was a simple product with various attributes. The table allowed users to add products to their cart or wishlist, sort by attributes, filter by values, and expand to show more details. This was too much for a single component.
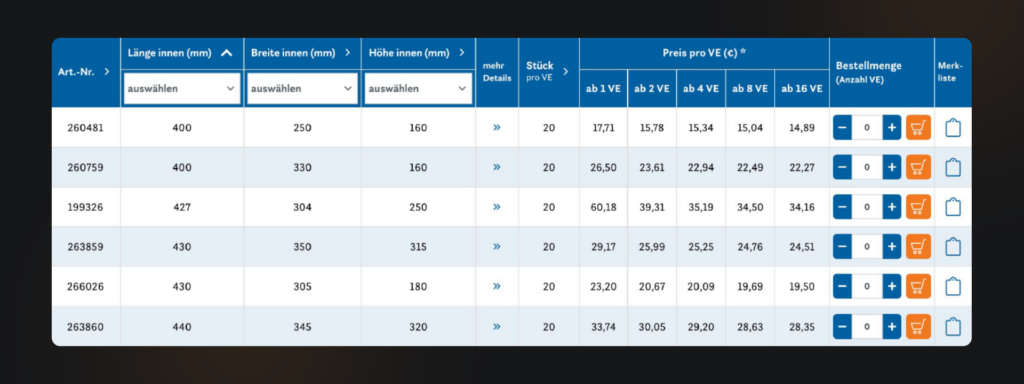
Initially, he wrote a regular component with state properties and methods, but it quickly grew too large. I decided to split the functionality into logical parts and create separate components for each. For example, he made a component for the UI handling conditional styling and formatting, another for sorting, one for the wishlist, and so on.
He defined and created methods for each component, then combined them into one object. He initialized a single component in the HTML and used each technique as if it belonged to the parent component. However, this approach needed clarification, as it was hard to distinguish which method belonged to which component.
To solve this, he added scoping by creating a parent component with properties representing each child component. This created a clear tree structure, making navigating, updating, and fixing bugs easy. Each component was placed in a different JS file, making the code easier to inherit and support, even when writing JS in PHTML templates.
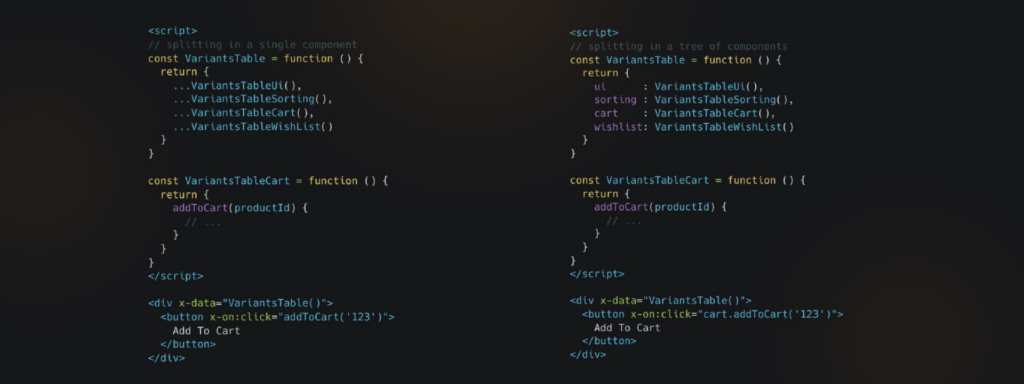
Whenever Alex foresees a significant user interface, I use this approach to split and manage components effectively.
Create “lazy” components
Sometimes, there are too many components on a single page. To handle this, he came up with the idea of “lazy” components, similar to the “lazy sizes” approach used before the “lazy” attributes became common.
For instance, consider collapsible boxes in the footer. Alpine JS typically renders all components it finds in the HTML upon the DOMContentLoaded event. However, we don’t need to initialize collapsible boxes in the footer when the page loads since we only initially see the header and the first screen.
“Lazy” components solve this problem. We replace the x- attributes of elements with a different attribute so Alpine JS doesn’t recognize and initialize them immediately. Then, we create an Intersection Observer for these elements to detect when they become visible on the page. When they intersect, we change the attributes back to their original names and initialize the components.
The methods for initialization differ between Alpine JS version 2 and version 3, but they essentially do the same thing. They initialize the components described in these elements.
“Lazy” components are beneficial when many components are not immediately visible on the first screen.
Conclusions
Hyvä represents a significant step forward for Magento front-end development. By addressing the performance and complexity issues associated with Luma, it provides a more efficient, effective, and enjoyable framework for developers. The benefits of improved website speed and streamlined development processes extend beyond the technical realm, offering tangible advantages for businesses in terms of customer satisfaction and the potential for significant revenue growth. As more developers and businesses adopt Hyvä, it is poised to become a cornerstone of modern Magento development.
This article provides a comprehensive overview based on the video, highlighting the key points and impacts of Hyvä on both development and business outcomes.
